Showing posts with label WIP. Show all posts

2 Sept 2013

Project Update - September

Long time no post! Jeez I'm bad.

Here's a rundown of my latest crochet projects.


 A pair of bobble mittens! These are super adorable, and the cotton is very comfortable to wear.


A Shaun the Sheep toy for my wee niece Mishka.

As for sewing, I'm making a pair of shorts using this tutorial. I'll make a dedicated post soon!

I've also been invited to a wedding (eeee)! I've settled on this pattern. I haven't decided on fabric yet, so I'll make a post once I get all that sorted.

22 Mar 2013

Cross-Stitch - It's a bird!

Hooray, you can actually tell what this thing is now!


Next up will be the nest - the most daunting part, I think. Probably because the colours of the nest are so similar.

First Post

13 Jan 2013

Mint Seersucker Dress - Hemming

Part One • Part Two

So after buying some extra yardage, I cut out the rest of the skirt sections. Instead of three sections, I cut four, so that I could easily insert the side pocket.

Here's the finished bodice:


I think the bust it still a little off. I'm probably going to tack down the facings as they are only slip-stitched to each other.

So the part that has been the most tedious of this dress has been the hemming. Four metres of bias binding, then four metres of hand-stitched slip-stitching. It took about six hours all up...I don't think I'm even exaggerating.

The good part is it looks neat, so I'm pretty proud.


I didn't have any cream binding left, so I used a dark green that I had left over from the Butterick 50s Dress.

I love pockets in dresses, so I added one!


A technique I've used a lot in this dress is stay-stitching, which keeps the inner fabric peeking up and showing on the outside. I used it on the pocket, neckline, and arm holes. The pocket looks good, but the opening is too large. I should be able to fix this fairly easily by just sewing in the right spot.

I have actually gathered the skirt (that also took forever) and sewn it to the bodice, but it needs tidying up. The gathering stitch is peeking through in one spot, and a bit of gathering got caught awkwardly so looks off. Unfortunately I didn't get any photos of this part!

There's not much left to do, apart from finishing a few bits and pieces, sewing in the zipper, and stabilising the waist.

3 Jan 2013

Mint Seersucker Dress

I was spending the day with Louella recently and re-discovered her stash of vintage sewing patterns. I found one in my size and she let me borrow it. We spent the rest of the afternoon at Whitecliffe mocking up a toile. It needed a few adjustments, mainly along the bust, and the waist was too small. The waist was easy to fix; the bust, not so much. I busted out my Vogue Sewing book which has a heap of helpful pattern adjustment tutorials.

After making the adjustments, I went fabric shopping (personally my favourite part!).


I found some delicious mint seersucker and bought it right away! I also got some off-white bias binding and various other notions. It wasn't until I got home that I realised that this will be the third green dress I've made, and I've only made three dresses! I really need to branch out.


I cut everything out using the adjusted pattern pieces. This stuff was really hard to draw on with the tailor's chalk. It is slightly stretchy, and the chalk doesn't transfer very well to the fabric. 


I pulled out a fabric remnant to use for an in-seam pocket that I can hopefully just chuck in there. I love pockets in dresses!


This is going to be a dress where I do everything properly. No cutting corners or being lazy, and making sure to plan where everything is going to go before starting to sew. The toile helped a lot in that I knew how to sew it before I used the fashion fabric.


This probably sounds bad, but it completely blew my mind when Louella informed me you can finish seams before you actually sew them! Before sewing the bodice together, I bias-bound the edges. This helps avoid the awkward binding into seam intersections that was happening on the last couple of dresses.


Seams that weren't really going to be seen were zig-zagged (and hopefully correctly). I bound the outside of the facing because I love binding things.

I finished the bodice section in a couple of days, then started cutting out the skirt sections. There are four, and they are about one metre squared. I managed to cut out three, then realised I only had half a metre left! I figured I had converted the yardage incorrectly to metres, or used the wrong yardage altogether. While the bodice has been completed for a while, I only managed to grab the rest of the fabric before Christmas. Soon I'll get started on the skirt, and I'll be able to show you the finished dress!

5 Nov 2012

King Arthur - Painting and Assembling the Gauntlets

Part One • Part Two • Part Three • Part Four

And so the painting began!

I had so much trouble with this, and let me tell you why...

First of all, it was a slightly windy day, and the things I was spraypainting are made of foam. This, combined with the forceful propellant of the spraypaint made the pieces jump all over the place.

My solution was to construct a sort of cardboard fortress inside the garage, open the door and windows, and spraypaint inside, away from the wind. So much better.


The pieces worryingly curled up after being painted, but let go after the paint dried.


I guess I should have used the black foam, seeing as I needed to paint the back anyway.


While waiting for the paint to dry, I constructed the elbow armour. After putting it all together, I remembered that the sun on top is gold, and the rest is silver. This means I should have painted the sun and armour separately before gluing them together. Oops!


This is everything after I had weathered it. Weathering turned out to be so much more fun than the actual spraypainting! It made everything look so much more realistic.

I know I said I was going to have to plan out how to construct the final gauntlet, but I got too excited so I glued it all together anyway.


I basically used hot glue for everything. I'm hoping it stays together on the night...

Tomorrow I'll be painting the elbow armour and hopefully making a start on the crown-helmet. I'll also find a way to attach the gauntlets to my hands - most likely by sewing some straps using velcro and scrap material so I can put them on and take them off easily.

Part One • Part Two • Part Three • Part Four

4 Nov 2012

King Arthur - Gauntlets

Part One • Part Two • Part Three • Part Four

So I've heard a lot about making armour from foam, and thought I might try it out in order to make King Arthur's gauntlets.


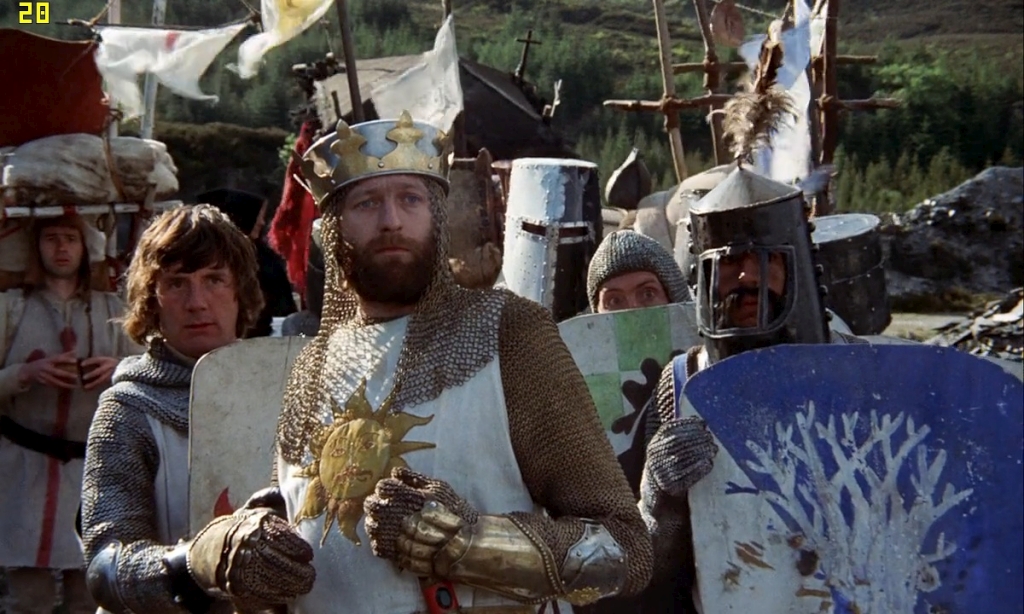
I took a screenshot from the movie to try and get a better picture of how his gauntlets are constructed. I mocked up some patterns on paper, then cut them out to use as a template.

I was worried I wouldn't be able to find any craft foam, and had no luck at The Warehouse or Warehouse Stationery. Fortunately, Spotlight pulled through and I bought a whole stack of foam sheets! I also got a bias-binder-maker and some extra hot glue sticks.


I picked out the white sheets and traced the template onto them, then cut all the pieces out.


After holding each piece (very, very) briefly over a gas element (note: not in the fire, above the fire) I bent each piece into shape. It was so fun!


In the reference pic above you'll see there are a bunch of rivets or something along the outside of the main gauntlet piece. I couldn't figure out how to make a nice hot glue sphere without putting it right on the edge, so it's not exactly the same as the real thing. It looks pretty messy but hopefully after paint has been added it'll look much tidier.


This is roughly how it will be put together. I was initially going to just glue it together, but it needs to be fairly flexible. I'm thinking I'll cut out a sort of mitt from fabric that lays on top of the 'chainmail'. It'll wrap around where necessary to secure it in place. Either that or I'll just glue it to the chainmail glove!


I also bought some spraypaint while I was out. First I'll use it on the armour, but I should also see what kind of effect it has on the yarn.

Part One • Part Two • Part Three • Part Four

King Arthur - Tunic nearly complete

Part One • Part Two • Part Three • Part Four

Yesterday I got started on the tunic! This material is fairly thick and coarse - fitting for a medieval tunic. I cut out two near-identical pieces (the neckline was lower on the front piece). I also split the pattern in half and cut out two pieces from the gold fabric to use as a lining.


After cutting everything out I secured the top edge of the gold lining - this would be sitting around the waistline.


I didn't get many photos of the actual construction of the tunic because it got dark and I couldn't be bothered getting the tripod out. Construction was pretty straightforward - I sewed the linings to the tunic and turned it, then sewed the rest of the tunic together, securing the seams with a zig-zag stitch.

Now, on the original costume the bottom edge had some plain gold binding or ribbon along it. I found some other ribbon at Geoff's Emporium that was a little more decorative. It was really fun sewing this on!


After this I have to figure out how I'm going to make the sun graphic on the front. I will probably end up simply painting it on with acrylic. I will also need to finish the chainmail top, and sort out how I'm going to make the small bits of armour like the gauntlets.

Part One • Part Two • Part Three • Part Four

3 Nov 2012

Costume Time: King Arthur from Monty Python and the Holy Grail

Part One • Part Two • Part Three • Part Four

With a Halloween party coming up in a week I decided I should get around to making a costume. Since I only recently began sewing, I haven't had the opportunity to create a really awesome Halloween costume yet.

I decided to go as King Arthur from Monty Python and the Holy Grail.

If you haven't watched the movie (please do so immediately), here is what he looks like:


Yes, he has a beard - I toyed with the idea of crocheting one, but if I can find a fake one, even better.

One problem I found was that there is a lot of chainmail, and I only have a week so I can't exactly make the stuff myself. A while ago I bought a bulk lot of grey wool, so I decided to crochet the coif and top. Using my biggest hook and very loose stitches, I came up with something that's "good enough".


One slight problem - these need to be gold! Since I'm going to need to get gold spray paint for the armour, I figured I might be able to get away with painting over it. Obviously I'll need to experiment - the single sleeve took me about five hours!

The thing I'm looking forward to making the most is the tunic. I've gathered my materials and I will soon be drafting up a pattern. It should be fairly straightforward - it is a shapeless tunic with a slit down the front and back. What you can't see from the reference photo above is the gold underlining in the skirt part of the tunic. I'm yet to completely figure out how to do it...


Time to start drafting!

Part One • Part Two • Part Three • Part Four

26 Sept 2012

A Painting Update

I while back I posted about an oil painting I was working on. Well, I'm still working on it!


The whole thing is filled in now. It's missing some fence posts and a fair bit of texture. After I took this photo I tried out some glazing (we'll see how that goes...).

The dry weather seems to make the paint dry more quickly. Three days after painting the road and grass it's dry again!

12 Sept 2012

1950s Dress - Completed Top Half


Okay, the top half is now complete!


This pattern actually required sew-in interfacing, but I only had fusible interfacing. No matter!


The difficult part of this top is probably the neckline. There's interfacing and facing in there. The facing needs to be clipped so it can be turned, and the interfacing needs to not get in the way. Fortunately everything lined up (a good reason to cut exactly on the line, and have the markings in the right places) and I sewed everything together. I tacked the facing down to keep it from popping out the top (a real problem!).


Here's a close-up of the sleeve hem. More binding! I love binding.

At this point I tried the top on (fun) and it is an okay fit. Not perfect, but pretty good.

Next up is to attach the skirt half to the top, then create some sort of hem. This will be a good opportunity to try making a blind hem using the sewing machine. Oh, and I need to buy more binding! The sleeves pretty much finished it off, and I want to bind the side seams.

11 Sept 2012

1950s Dress: Seam Binding

Part One · Part Three

I've made fast progress on the 1950s Butterick dress. The first dress I made was based on a newer pattern. This one was slightly different - all the pieces were pre-cut, the marks were all holes punched into the paper, and there was no ink. I much prefer this than cutting out the pattern and marking everything down. The holes allowed me to easily mark darts and notches.


Here you can see roughly the colour of the fabric. Last time I neglected to mark out most of the small dots (which ended up being a pain as they are actually important). Since the pattern had holes it was easy to chalk everything up.


I decided to do some seam binding for this dress (it's always good to learn something new). I was pretty nervous until I got started. I thought about pinning the whole thing but I'm sure it would be too time-consuming so just ran with it.


After getting my head around how the bias binding actually fits around the seam, it was pretty easy from there. As long as the side you're most likely to see looks good, it's all good!


Here's the result! A little wrinkly (probably due to too much pulling on the binding) but it's a really tidy way to finish up the seams. Unfortunately I only got five metres of binding (thought it would be enough, hahaha) so I'll have to get some more if I want to finish all the seams this way.

10 Sept 2012

Creeper Crochet Blanket - Not Big Enough!


Alas! The "finished" blanket is not large enough to satisfy any sort of snuggling needs. I thought I had finished; how wrong was I?!

To amend this, I took the Creeper body and exported it to three colours (no black) and I'm going to work a few more rows in. If I want to go all Golden Ratio, I'll have to make it 12 rows high, so four more rows.

This only annoys me because I thought I was so close to finishing it - it has almost been a year since I started the project. Plus I had to buy more yarn, and they were missing the light blue colour. The closest match I could find was an expensive knit meant for baby clothes (grrr). Fortunately it is relatively easy to match 8ply black yarn!

After finishing the last rows, I plan on edging it in black - and I'm kind of tempted to make a pretty shell edging.

Whelp, back to it then.

New Vintage Patterns and the Start of a New Dress

Part Two · Part Three

The other day Louella and I went to the Vintage Textile fair - a once-a-year event. Only we didn't decide to go until late afternoon! >o<

The fair was awesome. It consisted of dozens of stores selling antiques, vintage clothes, hats, bags, and crafts. I managed to pick up a few new patterns!

This one I got from Louella

This pack contains a skirt, waistcoat, dress, trousers,
and jacket pattern!

I intend on making the one on the right but the sheer
sleeves on the left one look amazing.

A simple, yet adorable, dress pattern


This last one I also received from Louella. I've been meaning to start making it - I absolutely adore the neckline!

There's no year on it but at a guess I'd say it's a 1950s dress (would gladly accept some confirmation).


I toddled down to the local fabric store and purchased some fabric and bits and bobs. The pattern instructs for the seams to be bound, so I think I'll find this seam binding tutorial handy.

The fabric I'm using will be a green linen. I've found I'm terrible at picking out fabric - I can never quite make the connection between the fabric and the final outfit. I wanted to use some sort of dark green synthetic velvet but I believe it was expensive and I have no idea how to sew with it.


I don't have a picture of the fabric right now because it's in the wash, so here's my washing machine instead!